Showing posts with label drop cloth cushion. Show all posts

Wednesday, January 1, 2014

The Cream of the Crop 2013

Happy New Year!  I hope your Holidays were everything you hoped for.  Mine were perfectly enjoyable.  Now that we have them behind us it is that time of year again, time to look back.

Drum roll please......

Top three most viewed:


First:  The Charak Table was the most viewed & the most comments.  Oddly enough, we chose not to paint it.


Second most viewed:  Vintage Windows.  This is also one of my personal favorites.


Third most viewed: My Wedding Chairs. This also had the most features.

MY PERSONAL FAVS!

1.


This antique phone table was so fun to do.  I love the color & the graphic was just perfect.  

2.

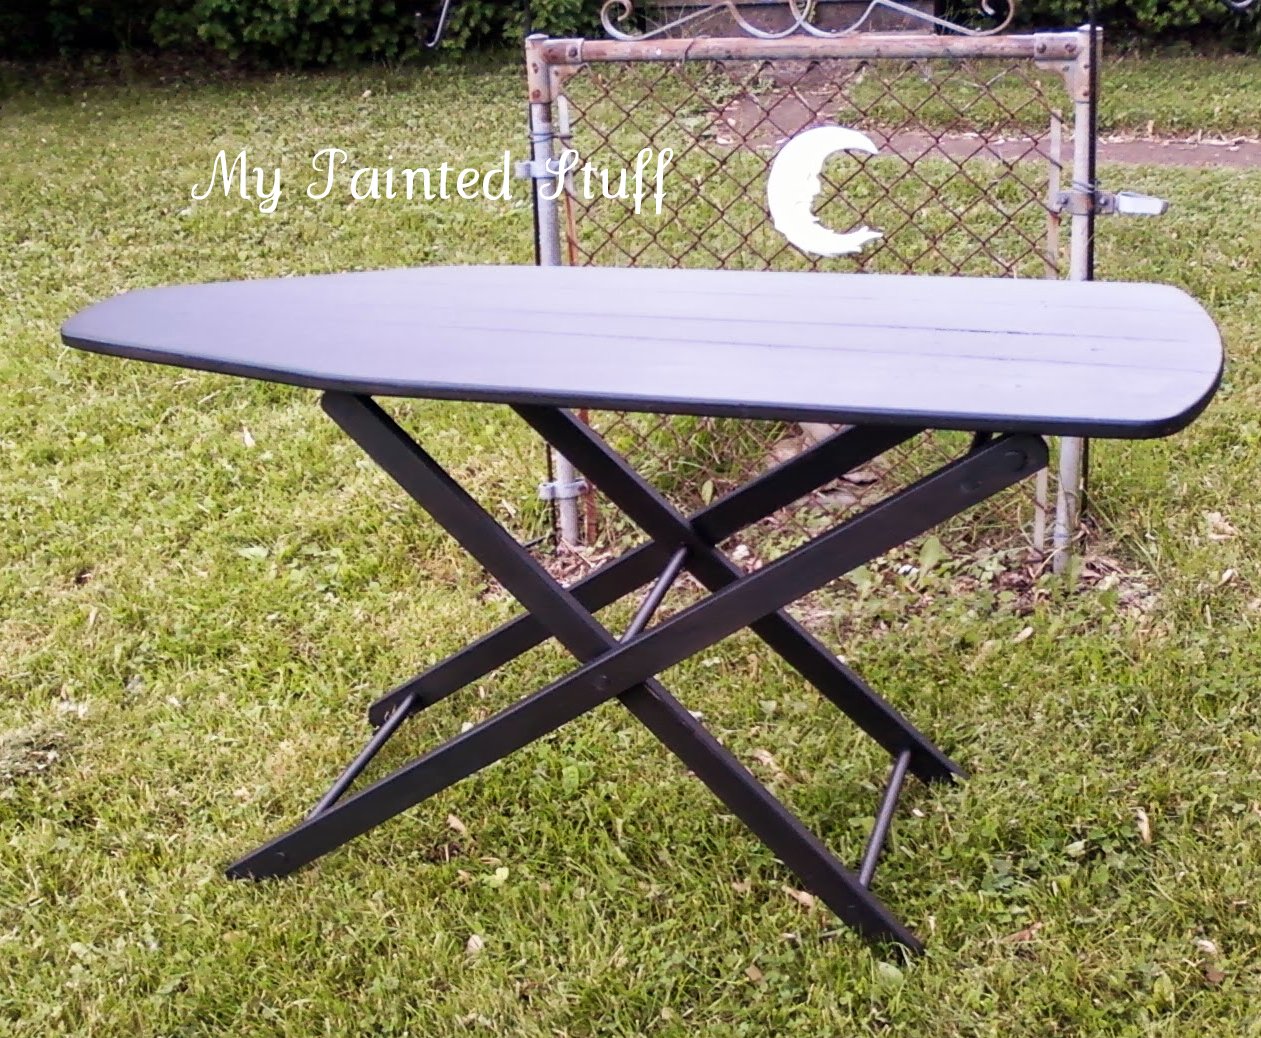
My French Laundry vintage ironing board.  I had a new stencil to play with & used a technique I learned years ago when I did Faux Finishing.

3.

This Sweet Waterfall Vanity turned out beautiful.  The vanity & the mirror were both roadside treasures, but what was so surprising was that I found them separately but in the same week. They went together perfectly. Love it when that happens.

4.

The Cornbread Yellow Cabinet was a team effort.  Loved the Chickadees.

5.

This Shabby Lamp Makeover was a challenge but so worth it.

6.

Chippy Blue Dresser was another project we chose not to paint. We loved the color so we just waxed it.

7.

The Medallion coffee table.  I used one of my all time favorite stencils on this.
8.

Gate leg table.  This turned out amazing! It belongs to my vendor sister, Lena.  It's for sale in her booth now, if your interested.

9.

The Serpentine Dresser.  I just realized I have not posted about this beauty.  I will have to do that in the near future because it's worth talking about. 

10.

My Shabby Fireplace is a keeper.  Another roadside treasure!  I plan on holding on to this one a little longer. It looks so nice in my booth as a prop.

It's been an exciting year.  We started teaching paint classes & brought a chalk paint line into our booth at Collette's Vintage & Antique Mall.


This is an amazing paint & very user friendly, it's called The Vintage Farmhouse Distressing Paint.
We also started a Facebook page so you can see what we're up to between posts.  For my birthday my Mom gave me a new camera, so my New Year's resolution is to make the time to take better pictures. 

Well, I hope you've enjoyed this stroll thru my year. I want to thank you all for your kind words, inspiration & encouragement.  
Thanks for visiting me.  I hope you all have a happy, healthy & prosperous year ahead.  Dee

Friday, June 14, 2013

A Few Thank Yous & a Sneak Peek

I hope your Summer is off to a great start.  I for one am elated it is finally here. I've been super busy with custom work & the end of the school year stuff, as I'm sure you all are right now.

I have a few Thank Yous to make I would first like to thank Karen from The Graphics Fairy for featuring my Cycling Coffee table.  

Available at Collette's Vintage in Burton, MI


Karen has great taste in vintage graphics & I so appreciate the hard work she does providing all of us everyday with the coolest free graphics.

This same table was also featured by Kerryanne at Shabby Art Boutique. She has a beautiful blog & she has created a wonderful online magazine called "Simply Shabbilicious". Not only does it feature some of the nicest blogs out there, it's free!  So thank you Kerryanne, I appreciate the feature.

Finally, today Stephanie at Furniture Flippin featured my My Wedding Chairs.

Sold

She has such a great sense of humor, I love checking out her Facebook page. She does a weekly feature of other people's work/blog. Thanks again Stephanie!

Now for the Sneak Peek.  I purchased an antique wooden Ironing board last week from a fellow vendor at Collette's.  I painted it Black & am mulling over a few ideas in my head on the graphic. Here is what it looks like now:


Bought some new French script stencils, I can't wait to try.


Stay tuned to see what happens when I combine the two.

Thanks for stopping by.  Be sure to check us out on Facebook. Have a great weekend!  Dee

Wednesday, March 13, 2013

My Wedding Chairs

I can't believe it's been a month since my last post. I know I've been busy lately, but really have nothing to show for it. When you live in the north during the middle of the winter, it's hard to get motivated to paint. Especially when I normally paint outside. Enough for my lame excuses. I have something super special to share with you today.
Sometime in January, I was primping my booth and spotted a pair of chairs I thought would be perfect for my upcoming upholstery class. I kept my eye on them & finally they were marked down to a honey of a price so I snatched them up. Here is a picture of the before:


I know, hideous right? But so much potential. I loved the shape. So this is what I started with & after the first class they were stripped of all that crushed velvet & lumpy padding.  I painted the wood in Old White & gave it a couple of coats of clear wax.


Distressed it here & there....

    
Love those details....


I used my favorite fabric, drop cloth, & added some graphics..


With the wedding season upon us, I thought how appropriate would these be. I created the script on my computer in Publisher, then transferred them to the inside back panels. After much measuring and adjusting, this is how they looked after three classes.


I added graphics to the back too!

Now came the challenging part. Up to now it was pretty easy, stapling, pulling, more stapling. But, now it was time to sew. I hate sewing. I am a terrible sewer (is that even a real word?). Give me a paint brush any day. My instructor Terry was so patient with me. I would sew a little bit, then have to rip it back out. The sewing machine I was on was so flipping darn fast, I was afraid I was going to sew right thru my thumb before I could stop & get it out of the way! Well it took me two classes to finish my first cushion box. When I started the second cushion I thought, this one should be much easier. Yeah Right.... the first thing I did was sew the top panel on wrong side up or inside out. Had to rip that one out & start over. That's a mistake I won't be making again. Huge waste of time. Here is my semi finished cushion box/cover. I apparently forgot to get a picture of a completed cover.

Blurrie camera phone picture.
 I decided to use white "Gimp" instead of welting or cording. I like the contrast of the white against the  drop cloth & the old white paint. I hot glued it all around to cover over the staples. Here is the final result of all my weeks of hard work:


I like this font for the style of these chairs.


For the crown images, I went over to my favorite site for graphics, The Graphics Fairy. This is the "MRS." crown.


And this is the "MR." crown.


Can't you just see a Bride sitting in this chair on her wedding day, posing for pictures with her "Mr."


What fun photo props these could be.

Available at Sassy Fabric's in Grand Blanc, MI.
Or maybe on either side of the fireplace in a cozy living room. I was hoping to find a small round table to put in between them. I wanted to paint "&" really big on the top. I guess it wasn't meant to be, that might have been to much anyway.

This has been my most ambitious upholstery project so far. Will I try it again? Probably yes. Practice makes perfect, at least that's what I've been told. I hope if you have been thinking about trying your hand at upholstery you'll be brave & give it a try. If I can do it so can you.  Thanks for stopping by. I would love for you to leave me a comment. Let me know how you like my "Wedding Chairs". Have a Great Day!  Dee

linking up to:


Saturday, January 19, 2013

Sweet Little Writing Table


Hi Everyone! Hope all is well in your world. Sometime in December I found this adorable desk on Craig's List. It was the perfect size for what I had in mind. Here is how it looked when I pick it up:


Sorry for the crappy picture, it's from the CL ad. In my haste to get it started, I forgot to take a before picture.

I first had to give the whole thing a really good sanding. The old varnish was just chipping off all over the place & the top had issues. After the prep work was done, I gave it two coats of Duck Egg Blue. I love this color. Seems like everything I paint in this color sells quickly. Now we were ready for graphics.
Like I mentioned before, I had something in mind for this sweet little writing table. I have a favorite graphic I use a lot, so I go to the best source for vintage graphics "The Graphics Fairy"

Here is what it looks like now:


So much better! 


Here's a closeup of the top.

I used my overhead projector for the image transfer. 

Available at Sassy Fabrics in Grand Blanc, MI

Then I used the same image & decoupaged it on the sides & inside the drawers. Now I needed a chair & I had just the one.


You may remember this chair from an earlier post. You can read about it here.  I knew they would look good together because they were the same color but, I hadn't realized what a perfect match they were until it set them together. The scrolly detail mimics the top on the table & the curvy legs also match the legs on the table. What a nice surprise! We put this cute little set right in the front window at Sassy Fabrics. Karen was very happy to see something fresh & new go in the window.  

I better get busy now painting a replacement, as I'm sure this Sweet Little Writing Table will sell shortly. Thanks for visiting & have a great day!  Dee

Friday, January 11, 2013

The Most Amazing Roadside Rescue

On a beautiful day this past fall, my Mom & I were on our way back from a delivery to Sassy Fabrics, when we spotted the most amazing chair just sitting there on the curb in the middle of someones yard.  It was obviously set out to the road.  My Mom & I spotted it at the same time & immediately whipped the truck around & gunned it. There was another woman slowing down in her car who had just past this "most amazing chair", & she was putting it in park & walking towards it. Needless to say, I beat her to it. Sometimes you just want it more then the next guy. Here is a before picture of this "most amazing chair":
Poor baby right after surgery..

You could tell that someone was just driving to fast & lost this chair out of the back of their truck. Can you imagine their surprise when they realized they had lost this beautiful chair? I assume a very nice person picked it up off the road & placed it in the yard (near the curb) of the house we found it sitting. Thank you kind stranger, you totally made our day!

Once we got her home I assessed the damage. Poor baby had road rash & some fine hair line cracks. Nothing we couldn't repair.  This chair is sooo heavy, but incredibly sturdy. After cleaning her up, sanding, gluing & patching we were ready for paint.

With all that great detail I wanted to do a light color that would really show it off.  We chose Old White. After a couple of coats, we gave it a coat of clear wax, then I used the dark wax in all the beautiful details. What a difference that made. Take a look!

Feathers or Fronds?
Beautiful chunky legs!
 I added a graphic to the cushion from The Graphics Fairy (my favorite graphic site ever!).  I used drop cloth fabric (also my favorite fabric for upholstery).


I love this extra large seat.

Available at Sassy Fabrics in Grand Blanc, MI
These pictures just don't do this Amazing Chair justice. It is so beautiful in person. I'm sure it will find a loving home very soon. So, that is my story about the "Most Amazing Roadside Rescue".

I wish you all Happy & Prosperous Rescues! Thanks for stopping by & Have a Great Weekend!! Dee

Monday, December 10, 2012

A Lesson Learned

Happy Holidays everyone!  I hope you are all in the holiday spirit, I know I will be in about two more days. I've been working on a never ending custom job & it is nearly finished. Then I'll get into the Holiday swing.

Early in the spring a family friend gave us a very dated dining set. It was a table, four chairs & a buffet. I already showed you the buffet, you can read about it hereThe table is big & heavy & the chairs have that cane back. Two of the chairs had big holes punched in the caning.  Here is a picture of one of the chairs:

It was going to be impossible to repair & to expensive to replace, so I went with plan B.  I'm getting ahead of myself here, we first painted them Old White to match the buffet & did a clear wax on them. Here is the only before picture I have of the table (base), unfortunately I had already put one coat on it before I remembered to take the picture.


Now the dilemma with the chairs. I remembered Miss Mustard Seed had upholstered a caned back chair & used her tutorial as my guide, you can read about it here.  We went to our local upholstery shop & got some great advice on cost effective material & some tricks of the trade. My Mom & I plan on taking an upholstery class after the holidays, my hubby said he'd like to take it too. It'd be nice to know exactly what we are doing when it comes to this upholstery stuff.  Anyway, we used drop cloth fabric on the chairs. I of course had to add a graphic to the seat.  I seen the perfect one at The Graphics Fairy & added it to all four chairs. Here is how they turned out.


Front


Back
Don't you just love that scrolly detail.....


Compliments of The Graphics Fairy!

 All four in their new look....


I love the contrast of the white Gimp against the tan fabric, it really gives it that finished look.


One last look at all that hard work, approximately 25,000 staples & 500 glue sticks later....

Sold

Finally a complete set. They look pretty good together, don't you think!? We learned alot from doing this project. First, Don't be afraid of the unknown, do your homework & it's not so intimidating. Second, Get advice when you need it, makes the job so much easier. Third, once you've finished your project the next one will seem so do-able.  I hope this gives you some inspiration to give your scary project a try.  I'd love to hear about it.

 Thanks for visiting & take time to enjoy the Holidays!! Dee