Wednesday, April 24, 2013

Up Cycled Drawer Table

Hello everyone! I hope you are all having a wonderful day. I am just getting my day started & wanted to share alittle project I just finished.

If you follow my blog then you know I am not shy to pick up a roadside treasure. Last month I was on my way to an upholstery class I was taking & spotted a bunch of dresser drawers out to the trash. 

I didn't have time to stop & investigate but I promised myself, if they were still there on the way back I would take a closer look.  Well, sure enough they were still there two & a half hours later, but I needed to hurry because just up the street was the garbage truck!   Quick as I could I jumped out & looked them over. They were amazing. Solid wood, some were real deep, all had their hardware. What Luck!!

I loaded up every one of those babies!  Man were they heavy. They barely fit in my mini van.  Once I got them home I started looking around Pinterest, Hometalk & blogland for some inspiration.

I wanted to make them functional & pretty at the same time. A few of them were perfect for under the bed storage. So I painted them white on the outside & a pretty pastel aqua color called "Aqua Smoke" by Behr on the inside. I sprayed the hardware black. When they were finished I hauled them up to my booth where they have sat for the last two weeks. You can see them in this picture of my booth on the right:


In my garage I had another roadside treasure just waiting to be used, it was an end table my sister picked up for me in the fall. The top was to far gone to repair, but the legs were still good. 


This was my idea:


I wanted to attach the legs to the bottom of one of the drawers I had already painted. This is the picture I took while I was mulling it over.

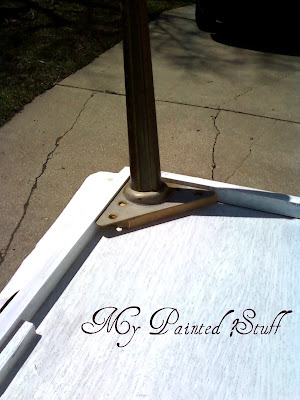
I took the legs off the table & sprayed them black.


Then I cut a piece of wood I had on hand to screw the legs into, as the drawer bottoms were to thin to screw into.


With some Liquid Nail & the original screws, I attached the legs to the bottom of the drawer.


How cute is that?!

It was such a sunny day that it kinda washed out the pretty color inside the drawer, but you get the idea.


What a perfect little table.....


And so portable....


This one went right back up to my booth. I would love to do this with the other two drawers I have painted.   I'll keep my eyes peeled for more roadside treasures with the legs I need. 

Here is a sneak peek at some old windows we have big plans for...


Stay tuned:)  Dee

Sunday, April 14, 2013

Green Le Jardin Table

I hope everyone had a fabulous weekend, mine went by way to fast. I wish I could find a way to squeeze a few more hours into the weekend.

Last month my son came home with a surprise for me.  It was garbage day in our neighborhood & he scored a roadside treasure. He even had the neighbor kids help him carry it on his way home from the bus stop. I am so proud, I taught him well.


It was a tall table with a butcher block top.  I think it was left out in the rain because the top was badly warped. You can really tell in this picture. I took this picture after we replaced the top. 

I had an old kitchen cabinet door (another roadside treasure) that fit perfectly for the replacement.  It was a few inches bigger which made the table top work area more versatile.


I like the scale of the new top.
I filled the holes with wood putty where the hardware went, after securing the top to the base.  Now I was ready for paint.

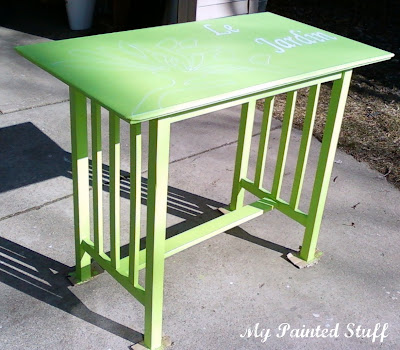
I am trying to expand my color pallet, so I was looking for a "Spring" color.  Green says "Spring" to me.
 I choose a color called "Tree Frog". It's from Ace Hardware, their new Clark & Kensington's primer & paint in one.   I love using this paint when I make my own Chalk paint. The flat interior latex paint works perfectly when turned into chalk paint.

I had seen the perfect graphic for this project a couple of months ago & couldn't wait to use it. So I headed over to The Graphics Fairy & created the words in Publisher. Here is a picture of the graphics after I transferred them on the top.


I used my overhead projector then took some white chalk to draw in the images.


I like to use the Elmer's paint pens for white graphics. I traced them in, then used white paint & a small brush to fill the words in.


I had intended to paint the Asian flower in solid but after I outlined it, I liked the way it looked.  A light distressing, two coats of clear wax & Voila!


I have to admit, this color was once again waaay out of my comfort zone. It felt a little "Kemit the frog" green at first. After I put the graphics on it, I liked it. It sort of grew on me.


It's counter top height so you could easily pull a stool up to it & use it for a desk, or put it in a kitchen for a work station or maybe a coffee station. 


Not bad for a roadside treasure.  Does it make you think of Spring? What would you use this table for?

Check us out on Facebook get a peek of what we're up to. Thank you so much for stopping by. Have a great week! Dee


Tuesday, April 9, 2013

Turquoise Blue Dresser

Hi everyone, I hope you all had a great Spring Break. I for one am happy to get back into the back to school routine. 

In the middle of last Summer my Mom was visiting my Aunt who was giving us a couple of desks. She also had an enormous dresser in her basement she was hoping we could use.
Here is a picture of the before:


When she came home & showed me this picture. My first thought was "Wow, I'm not sure paint could help that poor thing."
So there it stayed & waited, & waited, & waited.

Finally six months later we were ready to tackle this project. After putting hours into cleaning, gluing, & clamping it was ready for paint.

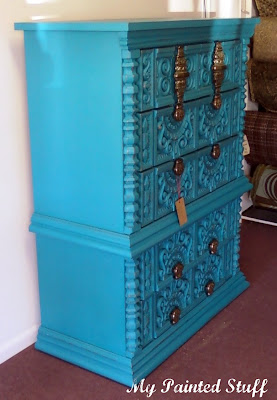
With all that detail I thought a bold color would really look good.
We went with this gorgeous turquoise blue, it's called "Pacific Palisades" from Benjamin Moore.

 
Wow what a difference paint can make!


After I took these pictures I realized we had the drawers in wrong.


Here is what it is supposed to look like:

Available at Sassy Fabrics in Grand Blanc, MI
Can you believe those handles? This is a style you either love or hate. I have to admit, it's growing on me. 
So what do you think? Could you live with this dresser?


I am so proud of my Mom, she did this one all on her own. I think she did a beautiful job. It turned out as vibrant & beautiful as she is.
Isn't she cute? She's full of energy & loves to laugh & have fun. Thanks Mom for all your help!

See what we're up to on Facebook. We have some exciting new things coming up. Thanks for visiting & have a great day!  Dee


Monday, April 1, 2013

My Booth Got A Facelift

Hi everyone! I hope you all had a beautiful Easter.

I have spent the last two weeks working on giving my booth at Collette's Vintage & Antique Mall a facelift.  I have needed to do this since I got new neighbors on my right & behind me. For those of you who have a booth you know what I'm talking about.

This is what my booth looked like when we started a year ago:


The mall had just opened & I was in desperate need of two walls, I was on a corner. A few days after I took this picture the space behind & on the right filled up & they had walls. 


Then I moved to the other side of the mall.

My neighbors behind me & on both sides all had walls, so I was good for along time. Within the last two months I lost two of my three walls. Something had to be done!


The hutch sold right after I took this picture, so I really had no defined space anymore.

After digging through the garage I came up with everything I needed to build some much needed walls for my booth. I had been hoarding a bunch of old doors. I also had some deck railing & tons of wood to make shelves out of. 

So I spent the last week and a half white washing everything. Not an easy feat in 30 degree temps. Here I am giving a section of the deck rail a coat of paint.


After getting everything mocked up, we were ready to set it up.

This is what we came up with.


This is the back wall.


The wall on the right.


The wall on the left.


I love the new shelves & the recycled vanity mirror frame we used to hang our booth sign from.


Now I'm ready for spring & ready to start with some new inventory. Come on warmer weather!!!

Be sure to check out us out on Facebook. Thank you for stopping by.  I hope you have a great day!  Dee


Thanks for the features ladies!

I have to take a minute to thank a couple of ladies for featuring "My Wedding Chairs" a couple of weeks ago.

First I need to thank Tammy at Homespun Happenings. She is always so sweet & hosts a nice linky party every weekend.

Next I'd like to thank Sharon at Elizabeth and Company. She always has a very diverse linky party. I like to check out the ladies who post the yummy recipes. Her party is every Tuesday.

Thank you Tammy & Sharon!